Nimbus
Open source cloud replacement for vacuum robots enabling local-only operation
View the Project on GitHub NimbusVacuum/Nimbus
General
Newcomer Guide Why Nimbus? Why not Nimbus? Getting Started Supported Robots Rooting Essentials Buying Supported Robots
Installation
Usage
Implementation Overview Capabilities Overview Upgrading Firmware Updates
Companion Apps
Valetudo Companion (Android) Valetudo Tray Companion (Windows) Valeronoi Lovelace Nimbus Map Card I Can't Believe It's Not Valetudo node-red-contrib-valetudo Fun & Games Other Noteworthy Projects
Integrations
Misc
FAQ Style Guide Troubleshooting
Development
Dreame rooting and installation
Reset-Button UART
To root using this method, you’ll only need a 3.3V USB to TTL Serial UART Adapter (like CP2102 or Pl2303) and dupont cables. Basic linux knowledge and a pry tool will help as well.
Note:
If this doesn't work on your robot, and it is an 1C, D9, F9 or Z500, your firmware might be too old.
In that case, try this guide.
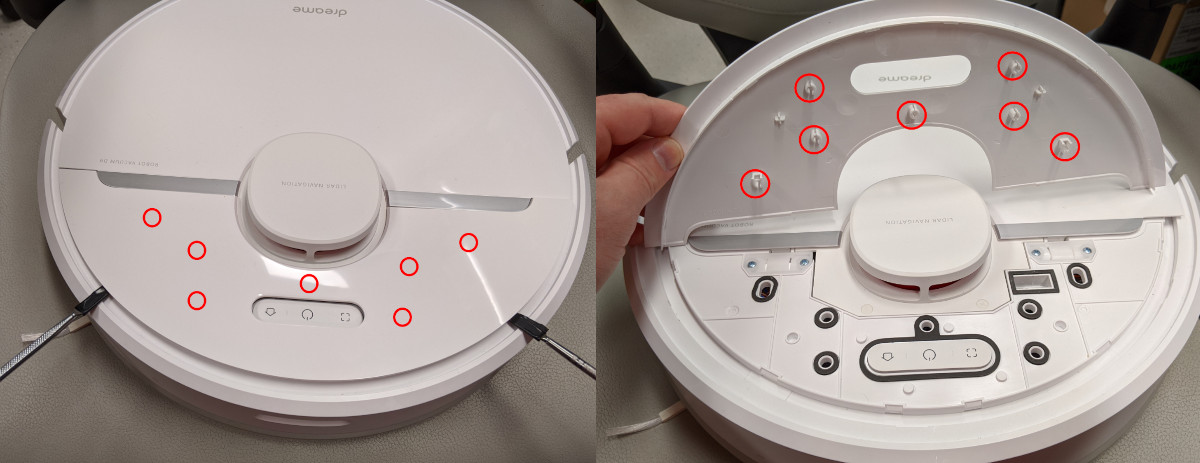
To open the robot, gently pry up with a pry tool or your fingers on the smaller half with the buttons. Taking this plastic off is probably the hardest step.
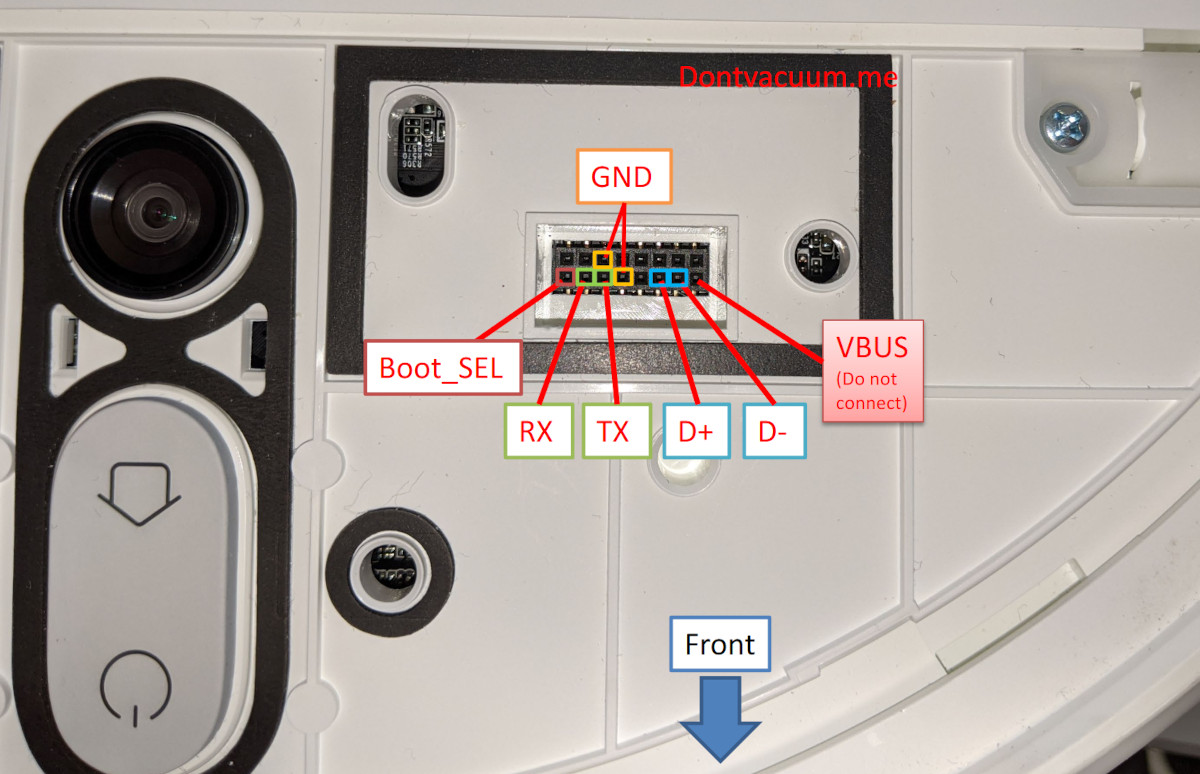
Once you have the cover off, you need to connect your USB to Serial UART adapter to the robot. Make sure your adapter is set to 3.3V if has the option to change to something else. You only need 3 wires for this connection (GND, RX, and TX). Connect GND on the adapter to any of ground ports on the robot first and then connect RX on the adapter to TX on the robot and TX on the adapter to RX on the robot. Lastly, plug the adapter into your laptop.
Now you have to open a serial connection from your laptop to the device. For that, you can use screen: screen /dev/ttyUSB0 115200,ixoff.
Your user also needs to have permission to access /dev/ttyUSB0 which usually either means being root or part of the dialout group.
Once your connection is ready, turn on the vacuum by pressing and holding the middle button (POWER) for at least 3 seconds.
You should see some logs and one of the last ones will say root password changed. If you instead see some random characters, check your cabling.
To use the Wi-Fi Reset method, open up the other side of the robot and press the reset button shortly (<1 second) with a pen or paperclip.
Your UART connection should pop up with the login prompt like "p2029_release login”
When connected, you can log in as root and then it will ask for a password.
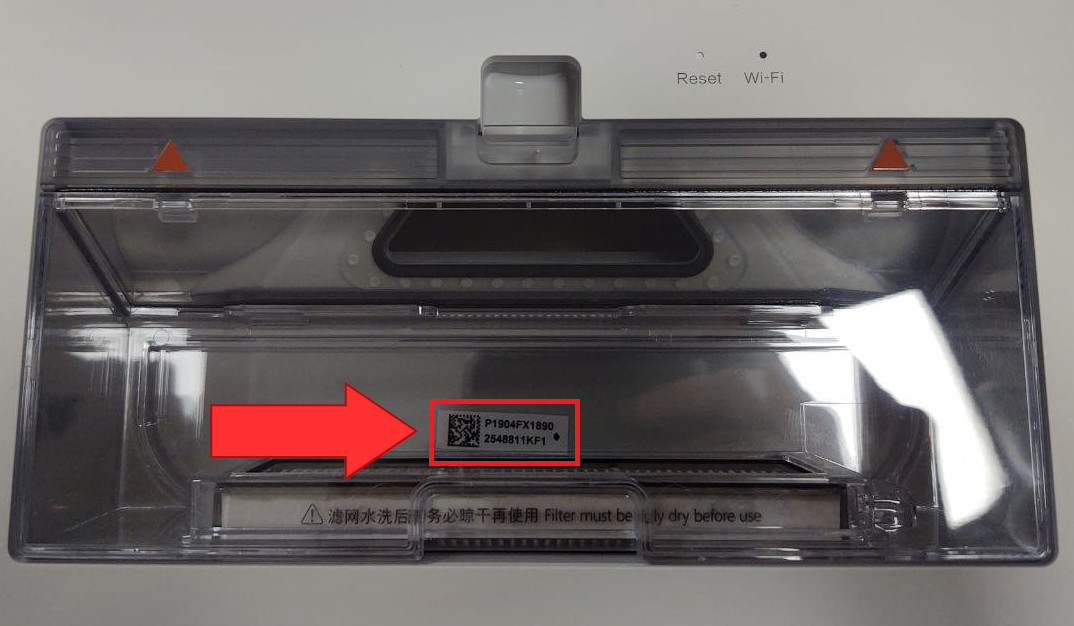
To calculate the password use the full serial number of your robot, which can be found on the sticker below the dustbin.
Not the one on the bottom of the robot nor the one on the packaging. You’ll have to take out the dustbin and look below it into the now empty space.
To get the password, use the following Calculator
or enter the full SN (all uppercase) into this shell command
echo -n "P20290000US00000ZM" | md5sum | base64
Once logged in, build a patched firmware image for manual installation via the Dustbuilder.
Make sure that both Prepackage nimbus and Patch DNS are selected before clicking on Create Job.
You will receive an email once it’s built. Download the tar.gz file from the link in that mail to your laptop.
With the tar.gz downloaded, head over to https://github.com/Hypfer/valetudo-helper-httpbridge
and download a matching binary for your laptops operating system.
Now, connect the laptop to the Wi-Fi Access Point of the robot. If you can’t see the robots Wi-Fi AP to connect to, it might have disabled itself because 30 minutes passed since the last boot. In that case, press and hold the two outer buttons until it starts talking to you.
The next step is to start the utility webserver. On Windows, a simple double-click on the exe should do the trick. Don’t close that window until you’re done.
The server will create a new www directory right next to itself as well as print out a few sample commands explaining how to download from and upload to it.
Make sure that it is listening on an IP in the range of 192.168.5.0/24 and then copy the downloaded tar.gz to the newly created www folder.
Important:
Before you continue with the rooting procedure of your robot, please make sure to create a backup of your calibration and identity data to allow for disaster recovery.
The easiest way of doing this is by creating a tar archive of everything important and then uploading it to your laptop, which at this point should be connected to the robots Wi-Fi AP.
To do that, head back to the UART shell and create a tar file of all the required files like so:
tar cvf /tmp/backup.tar /mnt/private/ /mnt/misc/ /etc/OTA_Key_pub.pem /etc/publickey.pem
Then, look at the output of the valetudo-helper-httpbridge instance you’ve started previously.
It contains an example curl command usable for uploading that should look similar to this one:
curl -X POST http://192.168.5.101:33671/upload -F 'file=@./file.tar'
Change the file parameter to file=@/tmp/backup.tar, execute the command and verify that the upload to your laptop
was successful. If everything worked out correctly, you should now see a backup.tar with a non-zero size in www/uploads.
If you’re experiencing issues, make sure that you’ve specified the correct port.
After uploading the backup and storing it in a safe place, you can now download the firmware image file that you’ve
previously put in the www directory. valetudo-helper-httpbridge will tell you the correct command, which should look
similar to this:
wget http://192.168.5.101:33671/file.tar
The file.tar part will of course be different.
After downloading the firmware image tar to your working directory (/tmp), it should be untared: tar -xvzf dreame.vacuum.pxxxx_fw.tar.gz.
Now, make sure that the robot is docked and then run the newly extracted installation script: ./install.sh.
The robot will install the rooted firmware image and then reboot on its own. Please be patient.
After the robot has finished the installation, you should see a new MOTD (message of the day) on your UART shell. It should look similar to this:
built with dustbuilder (https://builder.dontvacuum.me)
Fri 04 Feb 2022 10:08:21 PM UTC
1099
If you see that MOTD, the rooting procedure was successful.
You now have a rooted Dreame vacuum robot running Nimbus.
Now continue with the getting started guide.
Nimbus
Open source cloud replacement for vacuum robots enabling local-only operation
View the Project on GitHub NimbusVacuum/Nimbus
General
Newcomer Guide Why Nimbus? Why not Nimbus? Getting Started Supported Robots Rooting Essentials Buying Supported Robots
Installation
Usage
Implementation Overview Capabilities Overview Upgrading Firmware Updates
Companion Apps
Valetudo Companion (Android) Valetudo Tray Companion (Windows) Valeronoi Lovelace Nimbus Map Card I Can't Believe It's Not Valetudo node-red-contrib-valetudo Fun & Games Other Noteworthy Projects
Integrations
Misc
FAQ Style Guide Troubleshooting